
Ubuntu 20.04 Raspberry Pi Cluster
22 Dec 2020I thought I’d have some fun in December, setting up a Raspberry Pi cluster for running Kubernetes.
My goal was to automate as much of the process of setting up each node of the cluster as possible, as I’d read several blog posts on the subject and most require many manual steps having to be repeated on each node, and since I value repeatable processes I enjoyed the challenge of figuring it out.
I’m assuming a certain level of knowledge for readers of this post, so I’m not spelling out every step needed.
There are many posts on the internet which do a much better job of explaining things; for example, checkout this post Make Ubuntu server 20.04 boot from an SSD on Raspberry Pi 4 by Zakaria Smahi.
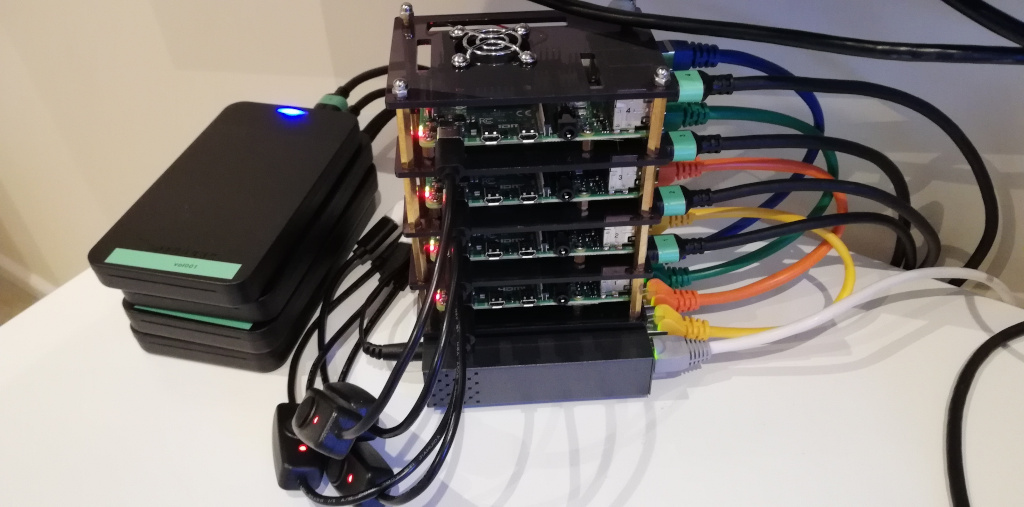
Inventory
First off, the inventory of components I am using:
Hardware
- 4 x Raspberry Pi Model B
- 4 x Official Raspberry Pi 4 Power Supply
- 4 x Micro-USB Cable with On/Off Switch (Optional)
- 4 x Baititon 2.5 inch SATA III Internal Solid State Drive 128GB SSD
- 4 x Sabrent 2.5-Inch SATA to USB 3.0 Tool-free External Hard Drive Enclosure
- 1 x Pi Rack Case for Raspberry Pi 4 Model B
- 1 x Netgear 5 Port Gigabit Ethernet Network Switch
- 1 x Pack of 0.25m CAT.5e Network Cables
- 1 x SanDisk Ultra 16 GB microSDHC Memory Card + SD Adapter
Since the Raspberry Pi 4 supports booting off an external drive via USB, I only purchased one SD Card, which will be needed to boot each Pi in order to enable booting from USB.
I’m planning to run Kubernetes on my cluster, so it is recommended to run off Solid State Drives as Kubernetes is disk heavy and the performance and lifetime of SSD’s is considerably better than that of an SD card.
EDIT: I had to update the firmware of the SSD drive enclosures to solve a slow boot issue. The updated firmware can be found on the Sabrent website and seaching for the EC-UASP model. I had to use a Windows computer to perform the firmware update.
Disk Images
- Raspberry Pi OS Lite - 2020-12-02-raspios-buster-armhf-lite.zip
- Ubuntu Server 20.04.1 LTS for Raspberry Pi 4 64 bit - ubuntu-20.04.1-preinstalled-server-arm64+raspi.img.xz
Steps
I followed these steps to setup my cluster from my Ubuntu laptop.
Enabling USB Boot
Booting the Raspberry Pi off USB isn’t enabled by default; enabling requires changing the boot order to first attempt USB followed by the SD card.
Flash the SD card with the Raspberry Pi OS Lite operating system. This article explains how to install the Raspberry Pi operating system image on an SD card.
SSH needs to be enabled so headless installation is possible. After flashing the SD card, mount it and create an empty file called ssh in the “boot” partition. Unmount and eject the SD card when done.
Insert the SD card into the first Raspberry Pi node and switch it on.
Figure out it’s IP address and connect via SSH from your PC. I used nmap 192.168.0.1-254 to figure out the IP address; given my home network is in the 192.168.0.x range, I limited the search to addresses between 1 and 254.
$ nmap 192.168.0.1-254

Starting Nmap 7.80 ( https://nmap.org ) at 2020-12-22 17:21 GMT

...

Nmap scan report for raspberrypi (192.168.0.76)
Host is up (0.0094s latency).
Not shown: 997 closed ports
PORT    STATE SERVICE
22/tcp  open  ssh

...
In my case, the IP was 192.168.0.76 and the default username is pi and password is raspberry.
$ ssh pi@192.168.0.76
The authenticity of host '192.168.0.76 (192.168.0.76)' can't be established.
ECDSA key fingerprint is SHA256:XxXxXXXxxx/ZZzyyyzZZZxxxXXxyyYYYZZzZzZZxxYy.
Are you sure you want to continue connecting (yes/no/[fingerprint])? yes
Warning: Permanently added '192.168.0.76' (ECDSA) to the list of known hosts.
pi@192.168.0.76's password:
Linux raspberrypi 5.10.0-v7l+ #1382 SMP Tue Dec 15 18:23:34 GMT 2020 armv7l

The programs included with the Debian GNU/Linux system are free software;
the exact distribution terms for each program are described in the
individual files in /usr/share/doc/*/copyright.

Debian GNU/Linux comes with ABSOLUTELY NO WARRANTY, to the extent
permitted by applicable law.
Last login: Tue Dec 22 18:57:21 2020

SSH is enabled and the default password for the 'pi' user has not been changed.
This is a security risk - please login as the 'pi' user and type 'passwd' to set a new password.

Wi-Fi is currently blocked by rfkill.
Use raspi-config to set the country before use.

pi@raspberrypi:~ $
Once you have an SSH terminal onto to first Raspberry Pi node you can configure the boot order.
See Raspberry Pi 4 bootloader configuration for how it is done.
Or use the raspi-config utility to configure via the console user-interface.
sudo raspi-config
Power off the node, running sudo poweroff, remove the SD card and repeat these steps for each of the nodes.
Provisioning Ubuntu
The following configuration files and scripts are required to provision the SSD drive for each Raspberry Pi node.
Create a directory on your PC and create each file with the following content, or clone this gist
-
usercfg.txt[pi4] max_framebuffers=2 gpu_mem=16 boot_delay dtoverlay=vc4-fkms-v3d kernel=vmlinux initramfs initrd.img followkernel -
user-data#cloud-config hostname: HOSTNAME manage_etc_hosts: true groups: - k8s users: - name: k8s gecos: Kubernetes passwd: "PASSWORD_HASH" lock_passwd: false primary_group: k8s groups: [adm, audio, cdrom, dialout, dip, floppy, lxd, netdev, plugdev, sudo, videom, k8s] sudo: ["ALL=(ALL) NOPASSWD:ALL"] shell: /bin/bash ssh_authorized_keys: - "SSH_AUTHORIZED_KEY" ssh_pwauth: false package_update: true package_upgrade: true -
network-configMy home network is on
192.168.0.*, but you may need to change the range for your network.version: 2 ethernets: eth0: dhcp4: false optional: true addresses: [192.168.0.IPSUFFIX/24] gateway4: 192.168.0.1 nameservers: search: [home] addresses: [8.8.8.8] -
auto_decompress_kernel#!/bin/bash -e # set variables BTPATH=/boot/firmware CKPATH=$BTPATH/vmlinuz DKPATH=$BTPATH/vmlinux # check if compression needs to be done if [ -e $BTPATH/check.md5 ]; then if md5sum --status --ignore-missing -c $BTPATH/check.md5; then echo -e "\e[32mFiles have not changed, decompression not needed\e[0m" exit 0 else echo -e "\e[31mHash failed, kernel will be decompressed\e[0m" fi fi # backup the old decompressed kernel mv $DKPATH $DKPATH.bak if [ ! $? == 0 ]; then echo -e "\e[31mDECOMPRESSED KERNEL BACKUP FAILED!\e[0m" exit 1 else echo -e "\e[32mDecompressed kernel backup was successful\e[0m" fi # decompress the new kernel echo "Decompressing kernel: "$CKPATH"..." zcat $CKPATH > $DKPATH if [ ! $? == 0 ]; then echo -e "\e[31mKERNEL FAILED TO DECOMPRESS!\e[0m" exit 1 else echo -e "\e[32mKernel decompressed succesfully\e[0m" fi # hash the new kernel for checking md5sum $CKPATH $DKPATH > $BTPATH/check.md5 if [ ! $? == 0 ]; then echo -e "\e[31mMD5 GENERATION FAILED!\e[0m" else echo -e "\e[32mMD5 generated succesfully\e[0m" fi exit 0 -
999_decompress_rpi_kernelDPkg::Post-Invoke {"/bin/bash /boot/firmware/auto_decompress_kernel"; }; -
provisionNB: Make this file executable. I.e.
chmod +x provision.#!/bin/bash -e if [[ $EUID -ne 0 ]]; then echo "Error: This script must be run as root" exit 1 fi if [ -z $1 ] || [ -z $2 ] || [ -z $3 ]; then echo "Usage: provision <device> <hostname> <ip-suffix>" exit 1 fi DEV=$1 HOSTNAME=$2 IPSUFFIX=$3 IMAGE=${IMAGE:-ubuntu-20.04.1-preinstalled-server-arm64+raspi.img.xz} PASSWORD=${PASSWORD:-p@ssw0rD} PASSWORD_HASH=$(mkpasswd --method=SHA-512 --rounds=4096 "$PASSWORD") SSH_AUTHORIZED_KEY=$(<~/.ssh/id_rsa.pub) if [ -z "$SKIP_FLASH" ]; then echo "Writing image to /dev/$DEV" time xzcat $IMAGE | dd of=/dev/$DEV bs=1M fi sync echo "Mounting /dev/$DEV" BOOT_VOL=mnt/boot ROOT_VOL=mnt/rootfs mkdir -p $BOOT_VOL $ROOT_VOL mount /dev/${DEV}1 $BOOT_VOL mount /dev/${DEV}2 $ROOT_VOL # copy user boot configuration cp usercfg.txt $BOOT_VOL/ # decompress kernel zcat $BOOT_VOL/vmlinuz > $BOOT_VOL/vmlinux # add script to automatically decompress kernel on apt install/upgrade cp auto_decompress_kernel $BOOT_VOL/ cp 999_decompress_rpi_kernel $ROOT_VOL/etc/apt/apt.conf.d/ # insert cgroup configurations sed -i "s/rootwait/rootwait cgroup_enable=cpuset cgroup_enable=memory cgroup_memory=1/g" $BOOT_VOL/cmdline.txt # user-data for cloud init cp user-data $BOOT_VOL/ sed -i "s/HOSTNAME/${HOSTNAME}/g" $BOOT_VOL/user-data sed -i "s|PASSWORD_HASH|${PASSWORD_HASH}|g" $BOOT_VOL/user-data sed -i "s|SSH_AUTHORIZED_KEY|${SSH_AUTHORIZED_KEY}|g" $BOOT_VOL/user-data # networking cp network-config $BOOT_VOL/ sed -i "s/IPSUFFIX/${IPSUFFIX}/g" $BOOT_VOL/network-config sync sleep 2 echo "Unmounting /dev/$DEV" umount $BOOT_VOL umount $ROOT_VOL exit 0
Make sure you have downloaded the Ubuntu disk image file from requirements above, and placed it in the same directory as the provision script, so your file layout should look like:
$ tree
.
├── 999_decompress_rpi_kernel
├── auto_decompress_kernel
├── network-config
├── provision
├── ubuntu-20.04.1-preinstalled-server-arm64+raspi.img.xz
├── user-data
└── usercfg.txt

0 directories, 7 files
VERY IMPORTANT!
After inserting the SSD drive you will need to figure out it’s block device name using lsblk, since the provision script will flash the SSD with the Ubuntu image, so you must be sure you have the correct device name.
For example, on my computer it is sdb but it might be different for you!
You can use lsblk to figure out which device name is correct.
$ lsblk

NAME                   MAJ:MIN RM   SIZE RO TYPE  MOUNTPOINT
loop0                    7:0    0 146.6M  1 loop  /snap/code/51
loop1                    7:1    0 143.8M  1 loop  /snap/code/52
...
sda                      8:0    0 238.5G  0 disk
├─sda1                   8:1    0   487M  0 part  /boot
├─sda2                   8:2    0     1K  0 part
└─sda5                   8:5    0   238G  0 part
  └─sda5_crypt         253:0    0   238G  0 crypt
    ├─ubuntu--vg-root  253:1    0   230G  0 lvm   /
    └─ubuntu--vg-swap_1
sdb                     11:0    0 128.0G  0 disk
...
The provision script requires providing the block device name, hostname for the node and the IP suffix.
I am going to have a 4 node Raspberry Pi cluster running Kubernetes, so I settled on host naming convention of rpi-k8s-<role>-<number> for my nodes, where <role> is the role of the node; either “server” or “agent”; and <number> is the instance number; starting from 001 to 999.
I decided to have my server node have the IP 192.168.0.100, followed by 192.168.0.101, 192.168.0.102 and 192.168.0.103 for each agent node.
Note: The Ubuntu image filename and password can be overridden by setting the IMAGE and PASSWORD environment variables before running the provision script.
E.g.
export IMAGE=ubuntu-20.04.1-preinstalled-server-arm64+raspi.img.xz
export PASSWORD=p@ssw0rD
Run the provision script with the following arguments for the server node:
./provision sbd rpi-k8s-server-001 100
I intend to run an HA server in future, so having the number 001 for the first server node makes it consistent for when I add the second server with 002.
And then for each agent node (inserting and ejecting each respective SSD in between):
./provision sbd rpi-k8s-agent-001 101
./provision sbd rpi-k8s-agent-002 102
./provision sbd rpi-k8s-agent-003 103
Finally, connect the SSD drives to each Raspberry Pi node and power them on.
Each node will automatically provision itself and after some time, you will be able to SSH onto them using the k8s user.
E.g.
ssh k8s@192.168.0.100
ssh k8s@192.168.0.101
ssh k8s@192.168.0.102
ssh k8s@192.168.0.103
Next, I’ll write a post on installing Kubernetes on the cluster.